Home  5  Books  5  GBEzine  5  News  5  HelpDesk  5  Register  5  GreenBuilding.co.uk
Not signed in (Sign In)

Categories


Green Building Bible, Fourth Edition
Green Building Bible, fourth edition (both books)
These two books are the perfect starting place to help you get to grips with one of the most vitally important aspects of our society - our homes and living environment.

PLEASE NOTE: A download link for Volume 1 will be sent to you by email and Volume 2 will be sent to you by post as a book.

Buy individually or both books together. Delivery is free!


powered by Surfing Waves


Vanilla 1.0.3 is a product of Lussumo. More Information: Documentation, Community Support.

Welcome to new Forum Visitors
Join the forum now and benefit from discussions with thousands of other green building fans and discounts on Green Building Press publications: Apply now.


    • CommentAuthorcc64
    • CommentTimeMar 22nd 2023 edited
     
    Hi Tom

    I appreciate your many contributions here. They've done much to push back my ignorance.

    I like this 95x35mm outer, 35x35mm frame approach.
    I'm concerned about the weight this frame assembly has to bear, though - one of my windows comes in at 85kg. I'd like for this to stay where I want it, not doing a gravity-assisted overwhelm of the picture frame assembly.

    Hence question what are you constructing your frame from? Compact foam would seem pricey. Otherwise what grade of construction timber? Something else?

    And is the frame the same all around, even at the cill carrying the lion's share of window weight? There's only a 35mm surface to interface with the (not entirely perfect) brickwork; are you using any bonding here to augment the screws mentioned?

    (Paranoid about free falling windows)

    Thanks
    •  
      CommentAuthorfostertom
    • CommentTimeMar 22nd 2023 edited
     
    Those are ordinary carpentry timbers - CLS (yuk) prob best as straightest and planed, but part-planed or sawn doesn't matter much, lowest C25 grade is fine, no great stresses. Same all round. Those long screws are pretty strong, can go @ whatever c/cs (or irregular as needed) you think necessary, clamps all very strongly to the wall (well crushing the expanding foam!), whether masonry or sheathed stud.

    Just looking at the section drawing above, the 'picture frame' does look unstable, liable to tilt under load - but don't forget it's strongly braced to the abutting ditto at the corners, so can't tilt, except yes maybe by twist/sagging towards centre of a long cill - so perhaps a short block of same vertically, similarly on-edge, screwed to wall to stop it sagging. The 35x35s also glued and screwed add stiffness and twist resistance.

    Why are we whispereing? I don't mind editing to make this public?
    •  
      CommentAuthorfostertom
    • CommentTimeMar 23rd 2023
     
    Good - I've made mine public and de-personalised - now yours?

    Not sure about the exact long screws but well available, surely?
    • CommentAuthorcc64
    • CommentTimeAug 6th 2023
     
    returning to this belatedly

    from the drawing shown this picture frame approach leaves ~1/3 of the frame depth exposed to the elements.

    How would you suggest protecting this arrangement from the elements, particularly at the top of windows not directly under the eaves (the OP asked about the practicalities of getting an installation before EWI though winter)

    ta
    •  
      CommentAuthordjh
    • CommentTimeAug 6th 2023
     
    This page of posts doesn't make a lot of sense - I suspect some is still hidden, but just to pick up a couple of points:
    Posted By: cc64at the cill carrying the lion's share of window weight
    There's no reason for the sill to carry the window's weight - if it is screwed to the supports through its sides, then those vertical supports carry most of the weight.
    How would you suggest protecting this arrangement from the elements, particularly at the top of windows not directly under the eaves
    Depends on whether aesthetics are important or not. If not then we protected an exposed construction similar to this over winter with a piece of DPM taped to the top (using Sicrall tape). It lasted fine for the six months or so it was exposed, and could have been redone at any time to extend the length of exposure if necessary.
    If aesthetics are important then some painted board or other screwed or [removably] glued in place. Board could be exterior plywood or plastic sheet or some cement board or whatever.
  1.  
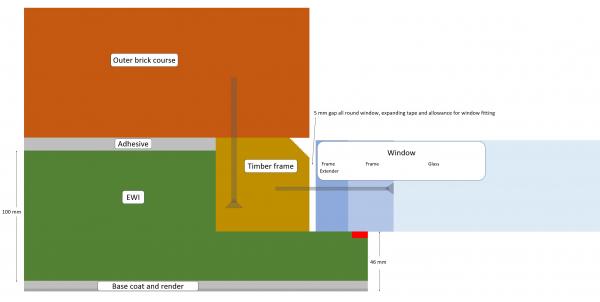
    We’re looking to do something similar to what fostertom has detailed but we’re going to use one piece of 75x72 timber with the corner cut off rather than join two pieces together, I’ve attached a pic. Then we’ll fill the gap created between the wood, the o/s wall and window with airtight foam (Soudal flexifoam SWS), also using the expanding foam tape as per fostertom, between the wall and the timber (not shown), and between the window and the timber (the frame extender is to enable us to insulate the reveals inside and to lap with EWI outside as the frame is narrow).

    What I’m not sure about is the DPM. This is currently wedged between the outer brick leaf and the closed cavity in the reveal. We will clear the closed cavity to remove thermal bridging, but am not sure what to do about the DPM. I suspect that we should remove the old DPM? Do we need to add new DPM somewhere in our new window install or is this taken care of with all the weatherproofing and airtighting products? We’re going to make the outside of the window weathertight and vapour open and make the inside of the window airtight.
      IMG_0842.jpeg
    • CommentAuthortony
    • CommentTimeAug 29th 2023
     
    I would make the new windows wider than the opening then fix through the frame or frame extension into the old outer skin.

    Ideally a bit of the real new window frame would have the reveal plaster onto it

    Maximise rather than minimise glass area
  2.  
    Posted By: tonyI would make the new windows wider than the opening then fix through the frame or frame extension into the old outer skin.

    Ideally a bit of the real new window frame would have the reveal plaster onto it

    With caution if you have inward opening tilt and turn lights
    • CommentAuthortony
    • CommentTimeAug 29th 2023
     
    My windows are those and there was 20mm of spare frame to hide behind the reveal. Outward opening windows are more forgiving inside at least
  3.  
    They open outwards so we decided on the frame extenders so there’s enough room to wrap the EWI (and insulated plasterboard inside) they won’t be seen at all as they’ll be insulated over.

    Any thoughts on the DPM?
    • CommentAuthortony
    • CommentTimeAug 31st 2023 edited
     
    I gave up on DPMs round windows as I can’t see a difference between a window reveal in a cavity wall and the body of the wall in terms of damp getting in.

    Certainly no need with EWI
  4.  
    Thanks Tony!
Add your comments

    Username Password
  • Format comments as
 
   
The Ecobuilding Buzz
Site Map    |   Home    |   View Cart    |   Pressroom   |   Business   |   Links   
Logout    

© Green Building Press