Home  5  Books  5  GBEzine  5  News  5  HelpDesk  5  Register  5  GreenBuilding.co.uk
Not signed in (Sign In)

Categories


Green Building Bible, Fourth Edition
Green Building Bible, fourth edition (both books)
These two books are the perfect starting place to help you get to grips with one of the most vitally important aspects of our society - our homes and living environment.

PLEASE NOTE: A download link for Volume 1 will be sent to you by email and Volume 2 will be sent to you by post as a book.

Buy individually or both books together. Delivery is free!


powered by Surfing Waves


Vanilla 1.0.3 is a product of Lussumo. More Information: Documentation, Community Support.

Welcome to new Forum Visitors
Join the forum now and benefit from discussions with thousands of other green building fans and discounts on Green Building Press publications: Apply now.


  1.  
    Hello again folks, I'm still working on the detail for my warm roof and have a few specific questions:

    1. Would anyone care to critique the detail in the pic attached? I'd be grateful for any constructive criticism of my draft - I've assembled this based on research on this forum and elsewhere but before going ahead with the build phase I'd love to get a sanity check that it's not terrible / is there anything we could be doing better etc - thank you in advance :)

    2. Foam? I have seen mention of some squirty foam being used when PIR isn't tightly fitting - what is this foam, should I be using it (instead of stuffing in something like wool) and what is its u-value? (The only one I've been able to find on a google is a Soudal one from Screwfix, but they give a u value of 35, which I'm perhaps mis-reading, as it would seem to be inaccurate by a factor of 100...)

    3. Mechanical fixings Anyone have any specific product suggestions for mechanically fixing PIR above the rafters? On here I've seen mention of some hammer-in fixings for example but not seen any specific product name or link to follow. Would need something around 115mm in length (going through 80mm PIR). And related to this - do people typically secure the Counter Battens (by which I mean the battens that run in line with the Rafters over the external insulation) separately after installing the PIR, or is it a case of securing the PIR with a minimal amount of screws, and then installing the Counter Battens through the PIR to the Rafters?

    I assume that they don't *need* to be thermally broken - partially I say this because our rafters are only 50mm wide, so any thermally broken fixings (ie. plastic covered) will be a tad difficult to use, but also it's the insulation external to the rafters, so hoping the thermal bridge it creates is less significant...

    4. VCL? Am I right in thinking that our Airtightness membrane we'll be placing on the inside of the PIR is also - in the context of this pitched warm roof - our Vapour Check/Control Layer (VCL)? (So long as it's taped at joins).

    Thanks in advance :smile:

    PS. re my proposed detail, I am unclear on whether I need the insulation to extend all the way to the ends of the rafters, as it's a good 30cm or so beyond the edge of the IWI (Woodfibre) coming up from the floor below - the main reason I have continued it down is that it looks to reduce the thermal bridge at the join...
  2.  
    picture now attached (sorry it's poor quality, seems to be limited to 500kb for attachments!)
      Screenshot 2023-01-29 at 23.31.53.png
    • CommentAuthorbhommels
    • CommentTimeJan 30th 2023
     
    I can only really comment on fixings: I used twistfix to secure the counterbattens to the rafters underneath the PIR.
    https://www.twistfix.co.uk
    Their site has a calculator to figure out how many fixings you need at what spacing etc.
    Their thermal conductivity is a lot lower than traditional screws of similar length.
    I bought their little alignment tool and used a hammer to get them in. If you have to do many, there exists an SDS tool for this.

    As for all the other details: it looks good to me but I'm no real expert.
    The detail at the fascia vent/tray is a bit unclear to me. The breather membrane goes over the tray (presumably), how is it held and where does it stop? There seems to be a horizontal bit there which I would avoid.
    And what the inside is going to be like, presumably you want some kind of finish over the VCL/AL to keep it in place and to avoid damage?
  3.  
    Hi No 33
    The squirty foam to which you refer is the ubiquitous Polyurethane foam widely used in the building industry as a quick fix and for sealing around window frames etc. (IMO often used to fill in for poor workmanship).
    U value about 0.03.
    When putting in rigid insulation between rafters the insulation is often cut under size and then foamed in to get a thermally tight joint. If you are using this method it is well worth getting a foam gun (they are quite cheap) because it is much easier to apply the foam controllably and there is less waste. The foam cartridge can stay on the gun for about 3 months without problems (in my experience) whereas the foam for use without a gun is a one shot exercise which will result in lots of waste. (Hand held and gun cans are different and not interchangeable) Search at Screwfix for types of foam and guns.
    For insulating between rafters I usually use glass or rock wool as I find it quicker and cheaper especially when the rafters don't match the sheet insulation size.

    You have put the breather membrane above the counter battens. Breather membranes usually go below the counter battens The idea of the counter battens is to provide a space between the membrane and the tile battens. Without this space any debris or water running down the membrane will collect at the tile battens and cause premature rot.
  4.  
    Posted By: bhommelsI used twistfix


    I second that. There is a bit of a knack but it's okay once you get used to it.
    The only downside is they are not easy (i.e. very difficult) to take apart again, so it's not "design-for-disassembly" if you are thinking of altering any time in the near future, e.g. adding a dormer or other extension. The builder we sold our last house to rang me to ask how the counter-battens were fixed as he couldn't see any screw heads (he was extending it). You can just use normal screws for this but there will be more cold bridging.

    Your PIR stop-batten should probably be at 90 degrees to the PIR (which is very easy to do), it's to help stop the PIR sliding off the rafters after all.

    I think you are supposed to have a greater or equal thickness of PIR over the rafters as there is in between.

    Have you checked that the existing rafters are actually 100mm deep? sometimes they are a bit less if they are planed-all-round timber and your 100mm PIR can end up sticking up out of the top or sticking out underneath (just something to be aware of. So you may want 90mm PIR between and 100mm PIR over to solve this.

    i don't think you need over-fascia vents with a warm roof, but others may know better.

    I am not an expert but have done this type of roof twice. I also used eaves protectors on both, I taped the breather membrane onto it with Tyvek tape.
  5.  
    Foam.

    I love it. You can use the Soudal one but the No-nonsense is just as good. If you need to stop half way through a can, just fold the tube back on itself near the tip and tape it in place until you need it again. The last bit of foam in the tube (past the bend) goes off, but you can firk it out with a screw or nail and your can is good to go again.

    Depending on the spacing of your rafters, some people cut the PIR short and foam the gap (fix the PIR in place with nails temporarily, until the foam is cured)
    This way you can minimise wastage - e.g. in my current case the gap between rafters is about 405 - 420mm
    so I cut my 1200 x 2400 boards into 3 lengthwise to give me 400mm x 2400mm and then foamed them in place.

    The downside of foam is that it sticks like the proverbial and can easily ruin clothes etc. you can only really remove it mechanically once it is cured, or if you are very quick you can use the foam-gun cleaner solvent spray BEFORE it is cured but you have to have spotted the incident to be able to deal with it quick enough!
  6.  
    Fixing the counter-battens

    Once you have done your between-the-rafter PIR, foamed all the gaps & trimmed off all the excess, and foil-taped all the joins and gaps.

    You just place the PIR on the top, which is helpfully kept in place by your stop-batten, make sure you have marked on the stop-batten where the rafters are underneath (because you won't be able to see them once the PIR is laid on top) place your counter-batten on top, one screw through it into the stop-batten, then get your inskew/twsitfix/helifix tool and start driving in the helical fixings at the proscribed spacing.

    (If you prefer to use normal screws then you will need to pre-drill the counterbattens to take the screws.)
  7.  
    Don't forget to drape the breather mebrane a bit between the counter-battens so that any water can run down past the tile battens to the eaves.
  8.  
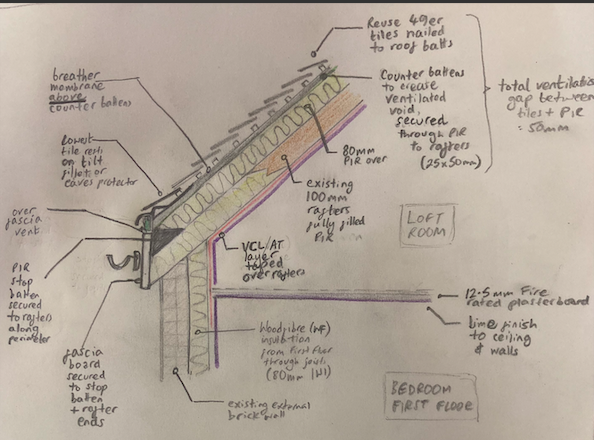
    Posted By: Peter_in_HungaryYou have put the breather membrane above the counter battens. Breather membranes usually go below the counter battens The idea of the counter battens is to provide a space between the membrane and the tile battens. Without this space any debris or water running down the membrane will collect at the tile battens and cause premature rot.


    Oops I missed this post.
    I think you can do it either way, I did one roof with the membrane draped over the counter-battens, then the second one with the membrane flat on the PIR then counterbattens on top. I don't know if one way is technically superior to the other. In retrospect I found the first way easier, but I suspect the second way is "better". Not sure why.
  9.  
    If the breather membrane is put on top of the counter battens then it should be put on with sufficient sag to ensure anything coming down the membrane can continue down without getting caught up on the tile battens. This usually means at least 25mm sag at the centre, more if the rafters have a wide spacing.
  10.  
    Posted By: bhommelsI can only really comment on fixings: I used twistfix to secure the counterbattens to the rafters underneath the PIR....


    thanks, that's superb info bhommels, will use that caculator.

    The detail at the fascia vent/tray is a bit unclear to me. The breather membrane goes over the tray (presumably), how is it held and where does it stop? There seems to be a horizontal bit there which I would avoid.
    And what the inside is going to be like, presumably you want some kind of finish over the VCL/AL to keep it in place and to avoid damage?


    Yes good point re the join between the tray and breather membrane - need to check that as I just popped it on the diagram without considering that - just knowing that I should use one to redirect any pooling rainwater away. It ties into the question of whether the membrane should be tight to the insulation or draped over the counter battens. Both of these seem to be acceptable methods - Tyvek's website has install videos showing both methods.
  11.  
    Posted By: Peter_in_HungaryHi No 33
    The squirty foam to which you refer is the ubiquitous Polyurethane foam widely used in the building industry as a quick fix and for sealing around window frames etc. (IMO often used to fill in for poor workmanship).
    U value about 0.03.


    Ok, so it is the same stuff - I've used it in a few places before. Peter, do you have a source for the 0.03 value of this stuff?

    For insulating between rafters I usually use glass or rock wool as I find it quicker and cheaper especially when the rafters don't match the sheet insulation size.


    Yes, this would be better but our rafters are only 100mm deep so if I used a wool I'd get half the U value for the same thickness, and I don't have the room to lose internally so figured PIR better for this particular case.

    You have put the breather membrane above the counter battens. Breather membranes usually go below the counter battens The idea of the counter battens is to provide a space between the membrane and the tile battens. Without this space any debris or water running down the membrane will collect at the tile battens and cause premature rot.


    Yeah, ISWYM. I was watching some installation guidance videos from Tyvek and they show both options, and I sort of 'selected' the one I thought made more sense (a bit draped over the counter battens) so that any moisture there would find its way into a little channel and down the roof... But I guess there is also the point you make which seems very valid! Thanks
  12.  
    Posted By: Dominic Cooney

    Your PIR stop-batten should probably be at 90 degrees to the PIR (which is very easy to do), it's to help stop the PIR sliding off the rafters after all.


    Excellent point! Clearly I was thinking in triangles at that point!

    I think you are supposed to have a greater or equal thickness of PIR over the rafters as there is in between.


    Yes I recall reading this but in the context of hybrid flat roofs - I thought for a pitched roof this would be ok...

    Have you checked that the existing rafters are actually 100mm deep? sometimes they are a bit less if they are planed-all-round timber and your 100mm PIR can end up sticking up out of the top or sticking out underneath (just something to be aware of. So you may want 90mm PIR between and 100mm PIR over to solve this.


    I will double check, but these are 100 year old 4 inch rafters rather than PAR stuff so they've tended to be 100mm elsewhere. It actually really confused me when I first started doing this retrofit - I was trying to find 100mm joists to infill downstairs but what is sold as 100mm is actually ~95mm these days!

    i don't think you need over-fascia vents with a warm roof, but others may know better.


    Yes I was hoping someone would clarify for me on this as I am confused about whether required or not. For a traditional cold flat roof or cold pitched roof you need ventilation, but for a warm roof generally it seems that you don't, but I assumed that given there are timber battens under the tiles, the timber needs to have some air circulation otherwise they could rot.. But then perhaps there is sufficient air circulation anyway without an added over fascia vent or some other over-engineered solution.
  13.  
    My reasoning is that normally those vents are to ventilate the underside of the roofing felt on a cold roof, so not required in a warm roof with a breather membrane (gaps around and under tiles are enough to ventilate the top side of the breather membrane).

    Others may know better than I
  14.  
    With your rafters then I would go 100 between 100 over. Nice and warm.
    •  
      CommentAuthordjh
    • CommentTimeJan 30th 2023 edited
     
    Posted By: number_thirty_threea Soudal one from Screwfix, but they give a u value of 35
    I couldn't find any value on the Screwfix site (my problem, I'm sure) but are you sure the 35 value was a U value? It sounds more like a conductivity value in mW/m.K. (i.e. Watts per metre x Kelvin) Divide by 1000 to get a value in W/m.K Still conductivity rather than U value but I wouldn't expect a U-value for foam. (what's the thickness of foam?) I found a data sheet that gives 37.0 W/m.K at https://www.soudal.co.uk/sites/default/files/soudal_api/document/F0031622_0001.pdf
    • CommentAuthorbhommels
    • CommentTimeJan 30th 2023
     
    Normally, the counterbattens run along the rafters. This way the shear load is evenly spread along the battens and the tile battens go across over the top. The twistfix calculator also assumes this and takes the shear load into account: the required number of fixings goes up a lot with steeper angles and heavier tiles!

    Fitting the membrane was a headache. If done wrongly, the air path from the fascia vent would have been closed off by the tray & membrane.
    In the end I went for the Siga recommendation and taped it with their thin foam tape to the top side of the counterbattens. You can let it sag in between but then you might get a fold where it goes over the tray where standing water could form, just where you do not want it!
    The tile battens were then nailed on top of the breather membrane & tape, creating a nice weatherproof seal.

    My warm roof has 110 over 110 between, with VCL below. Nice + warm indeed.
  15.  
    Posted By: number_thirty_three
    Posted By: Peter_in_HungaryHi No 33
    The squirty foam to which you refer is the ubiquitous Polyurethane foam widely used in the building industry as a quick fix and for sealing around window frames etc. (IMO often used to fill in for poor workmanship).
    U value about 0.03.


    Ok, so it is the same stuff - I've used it in a few places before. Peter, do you have a source for the 0.03 value of this stuff?

    Oops I got the decimal point wrong. It should have been 0.3
    Soudal data sheet
    https://www.pfetech.com/wp-content/uploads/2017/02/Soudal-Fill-Fix-Foam-TDS.pdf
    Insulation Factor 33 mW/mK
    which translates to about 0.3 at 75mm

    u value conversion nicked from
    https://www.turvac.eu/0/Products/Thermalconductivitycomparison.aspx
    • CommentAuthorcjard
    • CommentTimeJan 30th 2023 edited
     
    When talking about insulation effectiveness, be careful to use the same terms: U and lambda are related, but not the same - U is lambda for a given thickness, but lambda does get mislabelled as U

    It's probably better to keep it to lambda, as this gives comparison independent of thickness: PIR/PUR as a board is 0.022 to 0.033, wool might be up to 0.044 (worse). For that foam to be 33 mW/m.K, that is also 0.033, same as bad PUR board. Polyurethane foam from the soudal-esque cans isn't as good as polyurethane board because of the overall differences in the structure when the can foam's finished expanding

    Peter, I think you might have looked at the wrong row in the table; a material with a lambda of 0.033 and a thickness of 75mm has a U of 0.44, because 0.033 divided by 0.075 is 0.44. I suspect you looked at the PUR row, but we're discussing squirty foam that's closer to the rockwool row in terms of perfoamence [sic]
    •  
      CommentAuthordjh
    • CommentTimeJan 30th 2023
     
    Posted By: bhommelsIn the end I went for the Siga recommendation and taped it with their thin foam tape to the top side of the counterbattens. You can let it sag in between but then you might get a fold where it goes over the tray where standing water could form, just where you do not want it!
    I'm confused by this. If the membrane is over the top of the counterbattens and does not sag, then the membrane touches the bottom of the tile battens and you may get standing water as a result. The reason for the sag is precisely to avoid that possibility of standing water.

    I've never done it (I chose not to have any tiles) and I don't know about the detail at the eaves.
    • CommentAuthorbhommels
    • CommentTimeJan 31st 2023
     
    Posted By: djhI'm confused by this. If the membrane is over the top of the counterbattens and does not sag, then the membrane touches the bottom of the tile battens and you may get standing water as a result. The reason for the sag is precisely to avoid that possibility of standing water.

    Yes, good point. I went for a tiny amount of sag to avoid the problem you highlight here. PiH was referring earlier to 25mm of sag which for my low angle roof would have ended up creating a fold near the tray.
    I only realised all of this at the time I had to fit the membrane the day before the roofers were coming, hence the headache. Better detailing so that it does not come down to fine tuning the sag would have been nice, in the end it worked out though.
  16.  
    This roof has PIR 'sarking boards' which should prevent the membrane sagging too far and so collecting a puddle at the eaves.
    • CommentAuthorcjard
    • CommentTimeJan 31st 2023
     
    "then the membrane touches the bottom of the tile battens and you may get standing water as a result"

    I doubt it, to be honest. If water was that easy to keep out of leaking into structures (i.e. it's defeated by a strip of fabric-like material resting alongside a strip of wood-like material) the effort required to prevent roof leaks would be minimal

    The membrane would hold moisture against the back side of the wood for longer, and the ventilation path along the channels created by the wood grid would be vastly reduced, which could bring its own problems.. But standing water unlikely

    --

    It is not the job of the felt to keep the water out; it's merely a backup and also helpful for inclement waether while the tiles are still being installed. It makes sense to detail it well, so that it can actually perform its backup rather than be a chocolate fireguard
    • CommentAuthorborpin
    • CommentTimeJan 31st 2023
     
    Personally, I used membrane - counter batten, batten on my warm teacosy.

    I'd recommend Lindab steel guttering. Far superior to the UPVC crap. You can also get rafter brackets so leaving the facia alone.

    Don't fix the gutter too high. if you place a straight edge on the finished roof, the outer edge of the gutter should follow that line.

    If wooden fascia, stain/paint both sides before fixing.

    There doesn't seem to be any soffit.
  17.  
    The eaves guard on top of the counter battens will likely, as pointed out, create ponding in the membrane. I don't see any reason that it would not be fitted on top of the PIR, then counters over. You may need a final tile batten at the very end of the counters, to support the final tile. That also keeps the eaves guard tighter/lower into the gutter.

    No need for the facia vent. If the facia board is not tall enough to support the eaves guard, add another rip of timber on top of the facia upper face.

    Rotate the PIR stop batten 90o, so the short side rather than the hypotenuse sits on the rafters. That gives you your triangular infill/fixing timber, and a perp face to the PIR. Do same thing directly below - close off the gap between the rafters (as a noggin), where you've shown the PIR sailing over the brick wall, to the soffit area. You need a rigid soffit, or the birds will pick away at the PIR and nest in there.

    Would be worth drawing the detail for the first floor ceiling joists, and how they interact with the wall - how do you insulate/air tight around that zone. Like wise if you have any ceiling hangers (the vertical timbers that come from the rafter to the joist. They are a right pain to seal around.

    You're doing the right thing by drawing it all out - build it on paper, keep changing it till it's right, which has no cost, then build it for real.
    • CommentAuthorborpin
    • CommentTimeFeb 1st 2023
     
    The eaves guard or tray fits on top of the PIR & facia and dips towards the gutter. Then you have memberane and counterbattens.

    No vent needed (nothing to vent).

    Bottom row of tiles just rest on the gutter tray (and clipped if necessary).

    The uneven nature of the tiles provides a route for water out and air in.
  18.  
    Posted By: borpinI'd recommend Lindab steel guttering.


    I'd second that.
Add your comments

    Username Password
  • Format comments as
 
   
The Ecobuilding Buzz
Site Map    |   Home    |   View Cart    |   Pressroom   |   Business   |   Links   
Logout    

© Green Building Press