Home  5  Books  5  GBEzine  5  News  5  HelpDesk  5  Register  5  GreenBuilding.co.uk
Not signed in (Sign In)

Categories


Green Building Bible, Fourth Edition
Green Building Bible, fourth edition (both books)
These two books are the perfect starting place to help you get to grips with one of the most vitally important aspects of our society - our homes and living environment.

PLEASE NOTE: A download link for Volume 1 will be sent to you by email and Volume 2 will be sent to you by post as a book.

Buy individually or both books together. Delivery is free!


powered by Surfing Waves


Vanilla 1.0.3 is a product of Lussumo. More Information: Documentation, Community Support.

Welcome to new Forum Visitors
Join the forum now and benefit from discussions with thousands of other green building fans and discounts on Green Building Press publications: Apply now.


    • CommentAuthorDur
    • CommentTimeJul 14th 2023
     
    Hello

    Some while since I have been here which is an indication of how slow our project is taking.

    We have an Edwardian dormer bungalow semi and are soon to be starting on the ground floor by removing the suspended floors and fitting UFH from an ASHP. The floor make up will be sand blinding, DPM, 150mm Jabfloor 70, 50mm PIR then 150mm reinforced concrete slab.

    We are thinking on two options for positioning the UFH pipes.
    First is to put them onto the PIR using clip rail (which we have) then 70mm chairs to support the reinforcing for the concrete pour. This puts the pipes at the bottom of the 150 slab.
    Option 2 is is to put the mesh on the chairs and cable tie the pipe to the mesh.
    (Option 1 makes the fitting of the pipes at the correct spacings etc very eay compared with option 2)


    I have seen a number of discussions on both methods but they mostly seem to be in houses which are very well insulated. Our situation
    is that we are aiming to get the solid walls insulated up to BC renovation standard and very well air sealed (ultimately!). Wall insulation will extend down to the bottom of the floor insulation.
    The upstairs has 75mm pir between and 75 under the rafters and well taped and sealed.
    So while our insulation will be massively better than it was, it is not "well" insulated by this forum's standards.

    My question - will the difference in height of the ufh pipes in the slab have much of an impact in reaction times and could that be a problem? It seems to be a balance between thermal mass which would allow us to run the ASHP at lower temps but for longer for efficiency versus the reaction time if the temperature drops. But does the pipe at the bottom v the pipe in the middle of the slab make much difference?

    We do have a wood burning stove for a top up on winter evenings.

    Grateful for your thoughts!
    •  
      CommentAuthordjh
    • CommentTimeJul 14th 2023
     
    Posted By: Dur150mm Jabfloor 70, 50mm PIR then 150mm reinforced concrete slab
    Why the mix of EPS and PIR insulation?

    We are thinking on two options for positioning the UFH pipes.First is to put them onto the PIR using clip rail (which we have) then 70mm chairs to support the reinforcing for the concrete pour. This puts the pipes at the bottom of the 150 slab.
    Option 2 is is to put the mesh on the chairs and cable tie the pipe to the mesh.
    (Option 1 makes the fitting of the pipes at the correct spacings etc very eay compared with option 2)
    I'm no expert but I wouldn't have thought that tieing the pipe to the mesh was that difficult? It's presumably better thermally to have the pipe higher, plus it also puts it in the lower stress region of the slab, where it's less likely to cause any problems I would have thought?
    • CommentAuthorDur
    • CommentTimeJul 14th 2023
     
    "Why the mix of EPS and PIR insulation?"

    To improve U value a bit and gives a better surface if we use the clip rail which has a double sided tape on the base.
    • CommentAuthorrevor
    • CommentTimeJul 14th 2023
     
    Why is your slab 150 mm and reinforced?. Does it need to be so thick and reinforced and how will you treat the join to the existing walls. When we did our renovation the architect had specified mesh but the BCO had said it was not necessary as we were not disturbing the ground and we were not on a slope.
    I would consider DPM up to the existing wall DPC, concrete, insulation, UFH and screed. The screed if done well will give you a decent level surface to tile on and improve the response time of the heating system. With a HP running at lower temps you want to make things more in your favour burying pipes in 150 mm of concrete is not in my opinion a good idea.

    Posted By: djhI'm no expert but I wouldn't have thought that tieing the pipe to the mesh was that difficult?


    Not sure I would like to do it clambering over rebar mesh and bending / kneeling to do the job etc
    • CommentAuthorDur
    • CommentTimeJul 14th 2023
     
    I am fairly sold on using the slab as a thermal store so (at least a fair part of) the heating can be done off peak at night.
    I guess I am interested to know thoughts on how having the pipes at the bottom or in the middle of the slab woul affect the heating response.
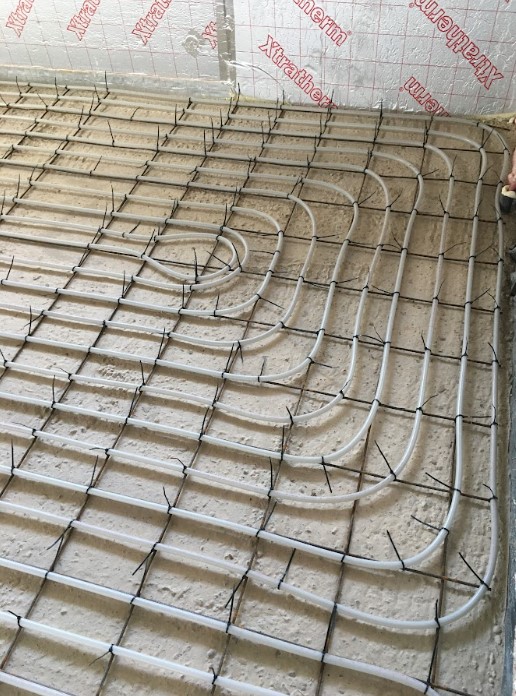
    Putting the pipes under the reinforcing obviously reduces the need to walk on it but maybe that is not a huge problem if it is well supported...
  1.  
    Posted By: Durusing the slab as a thermal store


    we have done this in the barn conversion.


    Posted By: Durpipes at the bottom or in the middle of the slab


    I don't think this wll make any appreciable difference. The only difference as I see it is between the two approaches discussed in this thread:
    1. slab as thermal store (slow response time, so aim for constant temperature instead) with insulation below
    and
    2. slab, then insulation on top, pipes and thinnish screed (65 -75mm) = fast response time
  2.  
    Having dug out the floor of the barn by about half a metre (depth constrained by foundations on the uphill side), we did 150mm of EPS in 2 x 75mm thick layers straight onto a 150mm layer of compacted crushed recyled concrete (most of which came out of the barn), then DPM, then 100mm concrete slab, then we laid reinforcing mesh on top and cable tied the UFH pipes to it at 100mm centres (the mesh was not for reinforcing so much as to tie the UFH pipes to), then sand & cement screed into which we laid the brick floor directly. so the thermal mass part of our floor is about 200mm thick.

    I made the U-value about 0.188
      UFH pipes.jpg
    • CommentAuthorDur
    • CommentTimeJul 15th 2023
     
    Thanks Dominic

    That is much the same as what we have done in a small new extension because the builder we used was not keen on putting the pipes into the concrete and we just needed to get on with it.
    For our next phase we have a bit more control and a bit more experience. We also have a tight schedule and putting the pipe in the concrete directly will save a bit of time and some cash.


    What is your experience with operation of your c 200 mm of thermal mass? Is that on an ASHP?
  3.  
    GSHP and it’s toasty in there. We also ran pipes in Aluminium spreader plates under the upstairs oak floorboards.
    I don’t have any detailed data or anything but it seems to stay at a constant temperature.
    • CommentAuthorDur
    • CommentTimeJul 16th 2023
     
    Thanks, sounds good

    We're going to fix to the mesh. It does makes more sense when I think about it.
  4.  
    The larger the thermal mass of the floor, the less reactive it will be. Ideally you'd run it constantly with a variable flow temperature driven by the outdoor temperature (which would keep the floor temp very close to the target room temperature.

    Ours has been running like the for 8 years now and it works really well, resulting in very stable internal temps.

    However, if your insulation levels aren't good that might result in slightly higher heating costs vs a reactive system (low thermal mass, higher flow temperatures) because it DOESNT really work if you want a different house temperature at different times of the day. (it's too slow to react to have cool in day time unoccupied/warmer in evening)
    • CommentAuthorDur
    • CommentTimeJul 17th 2023
     
    Thanks Simon

    I realise it can't be used in the same way as a traditional boiler heating system.
    I don't remember at the moment what the control options are on the heat pump (Ecodan B Plus) but I think it can follow outside temp.

    I am hoping that the house could be described as reasonably well insulated as far as slightly tricky renovations go! I think it will be ok ( fingers crossed!)
    • CommentAuthorSimon Still
    • CommentTimeJul 17th 2023 edited
     
    Yes, definitely has Weather Compensation.
    See this video
    https://www.youtube.com/watch?v=-983aLzVZ_I

    Note that in the comments the author of the video says
    "Mine was at 50c at -3c, I now have it at 35c at -5c and it's saved me a fortune and giving me an internal temp of 22c all day and night. I have all my stats set high to 28c, knowing that with such a low WC curve, my house will never reach 28c. I now use the WC to control my internal house temp, not the thermostats. With the stats set to 28c they are always calling for heat, so the hp is always running which means less chance of the hp short cycling. To many regular short cycling is not good for the life of the pump or your wallet as it uses a lot of kw each time it restarts. So try to keep the hp running for as long as you can, but tweak the WC to as low as you can but where it keeps the house warm. If your home is well insulated you will probably find after several days of running the pump 24/7 you have to lower the WC again due to the house holding the heat"

    I don't have any internal stats at all - system runs solely on the weather compensation. It does a bit of tweaking through the first winter or two but I've not touched it since. The aim is to get the flow temperatures as low as possible (and you can't set that up if internal stats are turning the system off)
    • CommentAuthorDur
    • CommentTimeJul 17th 2023
     
    Oh thanks, that is reassuring.

    I remembered figuring that we wanted to aim at running as low a temp as possible for as long as possible but it was so long ago (builder issues) that I had forgotten what we are doing or why.

    A friend renovated a place and had stats for every zone and then said afterwards that he thought you could do without most of them.

    We will have temp/humidity sensors in every room which will be hooked up to Home Assistant which would give control options if we want them but maybe just won't be needed.
    Just currently wondering whether to put sensors in the floor "just in case" but could be we can also do without.
    • CommentAuthorGreenPaddy
    • CommentTimeJul 17th 2023
     
    Bit late to the party, but...

    - I always fix UFH pipes to the mesh, on supports, then pour concrete. It might take a couple hours longer to tie the pipes than punch-clip to insulation, for an entire GF of a house, but it gives a good result.
    - I use a193 mesh, which is a bit thicker gauge than the usual a142, and so is easier to walk on for placing pipes.
    - I also prefer the metal mesh supports, that look lick a wire-frame Toblerone. They're more stable for walking over than the plastic stools.
    - Air pressure test the UFH pipes, and leave on for a day or so, including when conc is poured.
    - builders only every like to do what they've always done. "Do what you always did, get what you always got."
    • CommentAuthorrevor
    • CommentTimeJul 17th 2023
     
    Posted By: GreenPaddyAir pressure test the UFH pipes, and leave on for a day or so, including when conc is poured.


    Ideally it should be water at 6 bar until the concrete/screed has set is what my UFH designer recommended. It keeps the pipe "open" i.e. so does not get kinked/squashed by the weight of the screed or wheel barrows etc.
    It also serves as an useful indication of a leak. I asked the screeder who did our floor whether he had ever had a leak on a job. His reply was only once in over 20 years and that was due to a plank with a nail through it propped up against a wall fell and pierced a pipe. It is not recommended to pressurise with air due to the hazards involved but I did use air upstairs as did not want a possible leak ruining downstairs ceilings etc.

    Posted By: DurA friend renovated a place and had stats for every zone and then said afterwards that he thought you could do without most of them.


    I would agreed we have 18 stats over last winter we only had 3 rooms heated plus a wood burning stove. (We capture a lot of solar and have high thermal mass) The stats serve an useful purpose in that they display and record the temperature as well as run time of the heating zone. You can see graphically the temperature rise and fall of the room. Our pipes are about 50/60 mm from the floor finished tiled level and we tend to treat the under floor heating more like a giant radiator rather having heating on most of the time. As it turned we probably could have got away with not having UFH upstairs.
    • CommentAuthorDur
    • CommentTimeJul 17th 2023
     
    Thanks GreenPaddy and Revor.

    Useful tips on the heavier chairs and wire. I have seen some folk suggest padding between the wire and pipe at the cable tie point but plenty seem to say don't bother so interested in views on that. I saw a video where they were using small pieces of pipe lagging for this.
    I should be able to pressure test with water easy enough.

    We are having large radiators upstairs but hoping they won't have to do much work. We have managed to insulate upstairs pretty well and being dormer bungalow it's a relatively small volume to heat.

    Lost count of the number of times builder No1 has said "never done it like that before" and "why do you want that much insulation, you can get away with...', and I am not talking about a lot either.

    I'm told it will be worth it in the end!
    • CommentAuthorMike1
    • CommentTimeJul 18th 2023
     
    Posted By: GreenPaddy
    - I always fix UFH pipes to the mesh, on supports, then pour concrete.
    - I use a193 mesh, which is a bit thicker gauge than the usual a142, and so is easier to walk on for placing pipes.
    - I also prefer the metal mesh supports, that look lick a wire-frame Toblerone.
    - Air pressure test the UFH pipes, and leave on for a day or so, including when conc is poured.

    Pretty much what I've done, except sticking to A142 and using concrete chairs (ROM Meshmen spacers).
Add your comments

    Username Password
  • Format comments as
 
   
The Ecobuilding Buzz
Site Map    |   Home    |   View Cart    |   Pressroom   |   Business   |   Links   
Logout    

© Green Building Press