Home  5  Books  5  GBEzine  5  News  5  HelpDesk  5  Register  5  GreenBuilding.co.uk
Not signed in (Sign In)

Categories


Green Building Bible, Fourth Edition
Green Building Bible, fourth edition (both books)
These two books are the perfect starting place to help you get to grips with one of the most vitally important aspects of our society - our homes and living environment.

PLEASE NOTE: A download link for Volume 1 will be sent to you by email and Volume 2 will be sent to you by post as a book.

Buy individually or both books together. Delivery is free!


powered by Surfing Waves


Vanilla 1.0.3 is a product of Lussumo. More Information: Documentation, Community Support.

Welcome to new Forum Visitors
Join the forum now and benefit from discussions with thousands of other green building fans and discounts on Green Building Press publications: Apply now.


    • CommentAuthormaxsm
    • CommentTimeJan 14th 2023
     
    Hi all, just hoping for some advice on wet underfloor heating. I live in a 60s bungalow and the install would be in a flat-roof single story 'annexe' which is connected to the main property. My home is very poorly insulated and heated by a gas boiler and radiators but I'm currently speaking to architects with the aim of extending the property and bringing my energy usage right down (a new well-insulated roof and wrap around external insulation finished with render). The wet UFH in the annexe is a test to see if I would like it throughout the rest of the property.

    How deep will I need to dig down to end up with a new floor at the same level as the current concrete floor?

    After digging down I understand the layer order will be: 300mm insulation - DPM - concrete - 60mm wet UFH in screed - 15mm engineered wood floor. Is this in the correct order? Am I missing any layers? What thickness will the concrete be?

    In the short-term the wet UFH will be powered by a gas combi-boiler but I may end up with an air source heat pump and/or solar water heating in the future. Is there anything in terms of plumbing/thermostat set-ups I should do now to ensure the UFH is compatible with my future energy plans?

    Hope all that makes sense, any advice much appreciated, thanks
    • CommentAuthortony
    • CommentTimeJan 15th 2023
     
    Dig down 480 to a perfect cut finish , 300mm eps, 120 concrete, 60mm ufh, (I would do 80mm min ufh layer so 500 perfect dig
    • CommentAuthorGreenPaddy
    • CommentTimeJan 16th 2023
     
    300 EPS; DPM; 125 or 150 concrete (whichever your SE will agree to); a193 mesh in the concrete onto which your UFH pipes are cable tied

    That saves the cost/time of pouring the screed. Depending on the duration of the build, and thus drying out time of the conc slab, you may need to roller-on a liquid DPM over the slab, to retard the vapour upward passage which could cause issues with the finish layer.

    Have done that lots of times over the years. Works a treat, plus you've a finished level floor right away, not monkeying around with allowances for the screed, on every measurement.

    Skinning cats :bigsmile:
    • CommentAuthormaxsm
    • CommentTimeJan 16th 2023
     
    thanks both

    @tony: why would you advise the thicker screed layer?

    @ greenpaddy: so if I allow the concrete to dry properly I can do without the liquid DPM? and I can't visualise how the a193 mesh works sorry, would I lay the wood floor directly on top of the mesh? (a photo might help my tired brain!)
    • CommentAuthortony
    • CommentTimeJan 16th 2023
     
    Thin screeds are difficult to keep the pipes contained in and they crack more easily, sometimes breaking over where the pipes are too near the surface. Have also see door threshold carper screws drilled into pipes in doorways.
  1.  
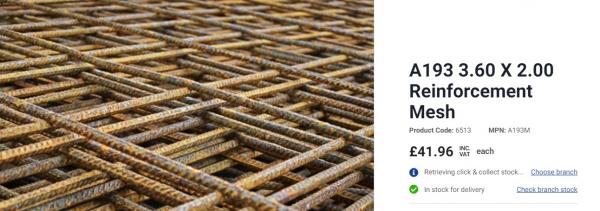
    A193 mesh is a concrete reinforcing steel grid. You can cable-tie your UFH pipes to it and then when the concrete is poured they end up suspended within the thickness of the slab and the mesh reinforces the slab.
      A193 mesh.jpg
  2.  
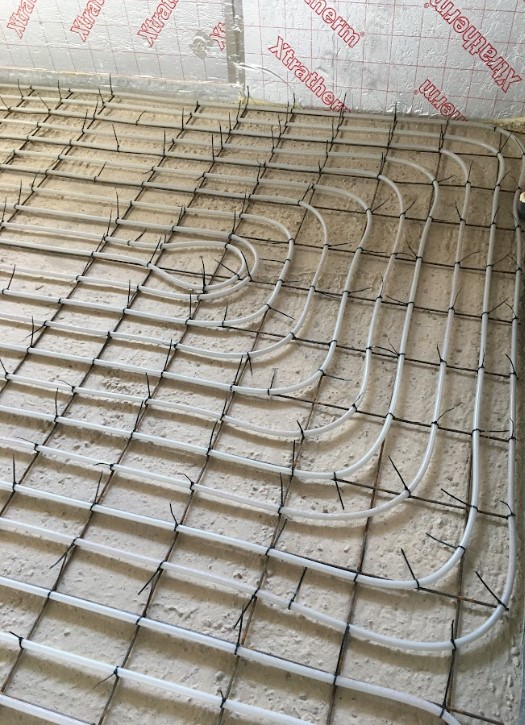
    In our case we poured the slab first, then mesh & pipes, then screed and brick floor laid with the screed.
      UFH pipes cable tied to mesh.jpg
  3.  
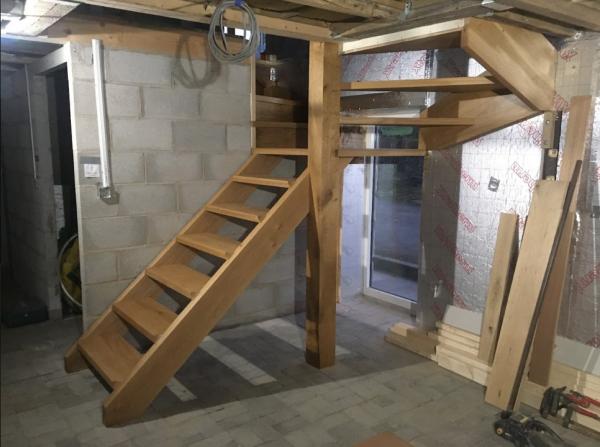
    This is how the brick surface of the floor in that room ended up.
      brick floor.jpg
    • CommentAuthorGreenPaddy
    • CommentTimeJan 17th 2023
     
    The mesh sits on little upstands, so it is approx mid concrete. That means pipes on top of the mesh, which then gives about 50mm top cover.
    I use the 193 mesh as it's heavier than the usual 142 (?) as walking on the thinner mesh makes it jump around and bend.
    There are plastic "stools" to set the mesh on, though my guys tend to prefer the steel "toblerones" (don't know the correct name - steel mesh supports should give you some google hits).
    From memory, conc slabs dry out / cure about a mm per day (of course that varies). If you pour the slab early, which I do before the kit is erected, then you may have enough time for curing, and no need for the liquid DPM. It's not a massive cost for the DPM, and easy enough to roller on.
    You need to do a bit of floating, to give a reasonable surface of the concrete, but not polished, but certainly not tamped ridges.
    If you find the odd low area (ponding) a little latex self level does the trick.
    • CommentAuthormaxsm
    • CommentTimeJan 18th 2023
     
    thankyou everyone - such generous advice and a huge help to me (can't believe I was wondering whether it was worth paying to join this forum!)

    @greenpaddy - so do you lay the 'toblerones' directly onto the DPM and then fix the mesh, pipes and pour concrete?

    in terms of heat transfer is there any advantage to using screed over concrete?
    • CommentAuthorborpin
    • CommentTimeJan 18th 2023
     
    Don't forget edge insulation.

    Also beware your levels if putting in inward opening doors. Check with the door manufacturer how high the bottom of the door is from the level the door frame sits on (yes I have that T-Shirt).
  4.  
    In some places I used 75mm EPS as edge insulation for ours - Offcuts from doing the floor (2 x 75mm layers) and in other areas 100mm PIR to join up with that lining the walls.
    • CommentAuthorGreenPaddy
    • CommentTimeJan 19th 2023
     
    maxsm - yes, laid loose ontop of the DPM.

    Heat transfer, my guess is better in concrete than a screed, but check the heat transfer rating. It's prob not a lot in it, so wouldn't chose one way over another based on that.
    • CommentAuthorrevor
    • CommentTimeJan 19th 2023
     
    Several ways of doing the same job. We laid a concrete slab on top of DPM which was incorporated in the blockwork DPC. The concrete in places because not completely flat was blinded with dry sand insulation over then UFH clipped to it and then screed 60 mm to finished level allowing for tiled floor finish. The screeders did not do a good job left high points in lots of places resulted me spending several days on me on my hands and knees with a concrete planer taking them off. A new timber frame build not far from us had to completely rework the lintels and other stuff on the first floor to allow for door height etc as someone somewhere had not allowed for the UFH on the 1st floor. They resulted it a lower ceiling that they had originally planned for. Very important to get the levels right at each stage of the construct.
    •  
      CommentAuthordjh
    • CommentTimeJan 19th 2023
     
    Posted By: borpinAlso beware your levels if putting in inward opening doors. Check with the door manufacturer how high the bottom of the door is from the level the door frame sits on (yes I have that T-Shirt).
    We have a mat well just inside the front door that allows the door to open without having to go over the top of the bamboo flooring (purely coincidental you understand :) Our other doors are outward-opening, except the patio door that we set the FFL from. (Oops!)
    • CommentAuthorwookey
    • CommentTimeAug 3rd 2023
     
    Rather than use all that concrete, you can put clay tiles on top of the insulation, which gives a faster-acting (and allegedly more efficient) floor. And 100mm less digging. Certainly dramatically lower-carbon.

    https://www.backtoearth.co.uk/lithotherm/
  5.  
    Mmmm, maybe I've misunderstood the clay tile system (??), but there needs to be a structural conc slab at some point. My preference is conc slab only, being the top layer, not conc slab plus screed. Saves carbon, labour, material costs and 70mm floor height (plus no chance of floor level errors, as the finished floor level is there from the start).
Add your comments

    Username Password
  • Format comments as
 
   
The Ecobuilding Buzz
Site Map    |   Home    |   View Cart    |   Pressroom   |   Business   |   Links   
Logout    

© Green Building Press